One of the best ways to add greater appeal to your next photo shoot or special event is with a backdrop. Using a backdrop helps to retain the focus of the viewer on both the theme (or setting/location) and the subject of your composition. This helps avoid distraction or mixed messaging in the final product.

While the idea of using a special background drape is probably as old as photography, choosing the right backdrop is more complicated than you think. To alleviate any stress, the Signs NYC team has simplified the process in this series of blogs. The focus of this article will be sizing.
How to Choose Backdrop Size?
Choosing backdrop size may look easy at a glance; however, professionals invest their time and energy in picking the right size and elements for their shoots. In this guide, we will be focusing on important points that you must consider before choosing your next backdrop for the event.
Size of Your Studio or Setting
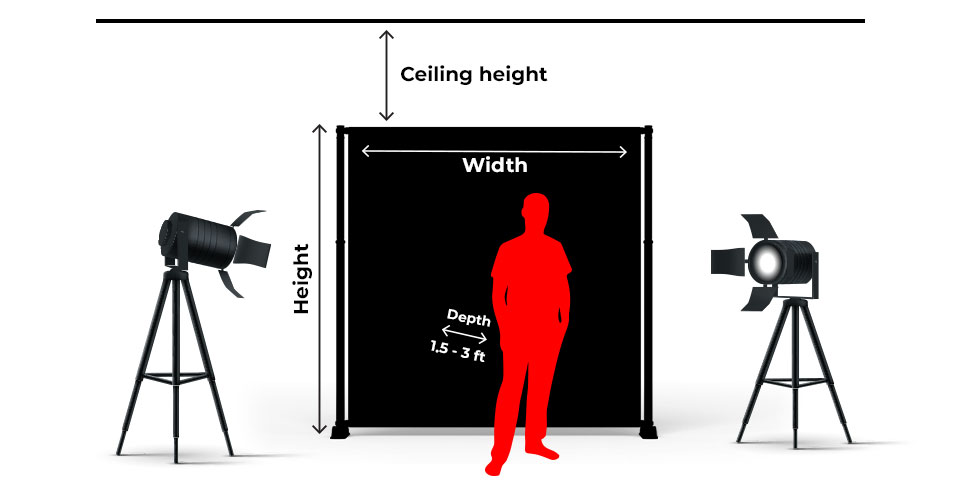
You will need to consider three measurements when trying to figure out the size of the backdrop you need for a particular space:
- Depth
- Width
- Ceiling Height

Depth – you will need between 1.5 and 3 feet of space between your subject(s) and the backdrop. This is to avoid shadows, as well as to fit any props or equipment into the gap.
Width – the main determiner of backdrop width is the number of subjects you will include and their size and position. A typical child’s portrait may only need 3- 5 feet in width, while a holiday-themed photo with a sleigh or one that shows the subject lying on his or her side may require a full 5 feet on each side. Normally, 10 feet is a good all-around choice.
Ceiling Height – studios tend to have high ceilings because the height of a room is its most limiting factor when it comes to both backdrop sizing and lighting. In general, you will need at least 4 feet of height above your subject’s head. This will allow you to properly light the person’s hair or (if the subject has no hair) the forehead and top of his or her head.
Size of Subject

Now that we’ve touched on the space needed to accommodate your photo subjects — including touching on the age/size/positioning with width and height determinations — let’s take a deeper dive into subject size with examples using our most popular backdrop sizes.
Subject Examples
- Child
- Adult
- Group
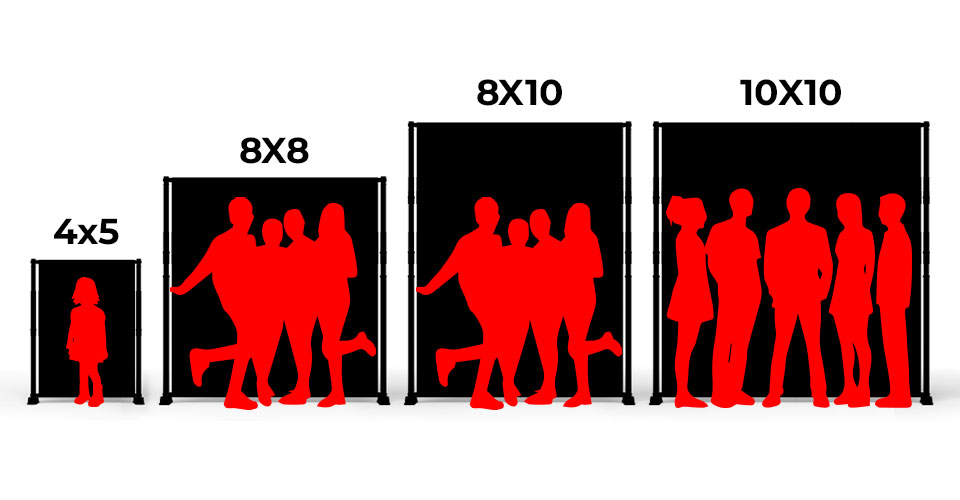
8×8 – this is our most popular size for a reason. This will accommodate a small, intimate family portrait or an “action” shot where the subject has plenty of room to move or position themselves in a side lying position.
8×10 – this is our most versatile size. It can accommodate most subjects, from single person portraits to larger, spread-out group photos. For large, seated groups requiring greater width, the backdrop can also be rotated to “magically” become a 10×8!
10×10 – if you were going to have just one backdrop for family photos in a larger space, this may be the one to have. It allows enough room for both standing and seated groups (remember our 4 feet of headroom rule!).
Custom Sizes – haven’t found what you’re looking for? We’re happy to offer any custom size in order to ensure you have just the backdrop you need for the job. Please keep this in mind when ordering for your specific dimensions
Dimensions
When writing the dimensions for a backdrop, width is always the first number. For example, an 8- foot by 10-foot (written 8×10) backdrop is 8 feet wide and 10 feet tall.
What Backdrop Material Options do YOU Have?
Our materials include a) Vinyl b) Fabric (Special order)
Vinyl
Just as vinyl is the workhorse of commercial graphics printing, the same is true for photography backdrops. Here are some tips for how to set up and install your vinyl backdrop right out of the packaging.
Learning Curve
Vinyl backdrops are rolled up into a tube for easy transport. When removing a vinyl banner from its mailing tube you can remove the temporary curve be re-rolling it with the graphics side facing out.
Place the back in the shipping tube for a few minutes and presto! You’ve flattened out your backdrop for an easy installation. If you need to deploy your backdrop on its stand immediately, it can be taped to the edges using masking or brown paper tape known as kraft tape.
If you have more time on your hands, simply allowing your graphic to lay on a level surface will eventually flatten out.
Handle With Care!
It’s also important to handle your backdrop with care. Any crinkling, scrunching or folding can leave a permanent mark that may even appear in photos! Avoid contact with sharp or hot objects and any dyed or painted substances.
If your backdrop gets dirty or dusty, wipe it immediately with a clean, damp cloth. Fortunately, vinyl is water-resistant and easy to clean. However, your graphic is a printed product so it must be treated with care to avoid permanently altering its color or finish.
Fabric
If you’re interested in specialty backdrop materials such as fabric, please contact Signs NYC for pricing, availability, and more.
Uses of Photo Backdrops
There are many opportunities to utilize your photography backdrops, including special circumstances. These include studio portraiture, special occasions such as parties, press conferences, and corporate events (step-and-repeat).
We recommend a special type of backdrop for media and corporate events, known as a step-and-repeat banner. You can check out our blog on step-and-repeats for more information.
The Signs NYC Difference
If you’ve ever had to order one of these products from a printer, you’ll know that using a more experienced shop makes for a better experience. Signs NYC has been expertly designing, printing, and installing a wide range of commercial graphics for over three decades. We collaborate with business owners, managers, organizations, and freelancers to create the perfect backdrop for your needs.
Our service area extends beyond NYC into most of New Jersey, Long Island, Westchester, Connecticut, and Eastern Pennsylvania. We can also stage booths for expos, trade shows, and conventions with our backdrop banner stands and media walls, along with red carpet events, galas, and press conferences with our step-and-repeat banners.
We offer custom sizing and rush orders to accommodate your needs better. If you’re looking for additional advice on texture, colors, or hanging your backdrop, look no further. We’re happy to provide the latest information on both what’s available and what will work for you.
Conclusion
In this blog we’ve reviewed several themes that were touched on earlier in this series, such as sizing, materials, and measurements. Remember, it’s always better to have too much backdrop than not enough. While we can’t cover everything, the last three blogs will give you enough of the basics to go on. It can be an overwhelming process. Fortunately, we’ve done our homework so you don’t have to!